At first I have felt great difficult in understanding what exactly I have to do to implement Silverlight application using MVVM. In order to work with MVVM first you should aware of RIA Services.
Here is a simple example how we develop applications using MVVM Pattern.
Open Visual Studio and take create new Silverlight Application.

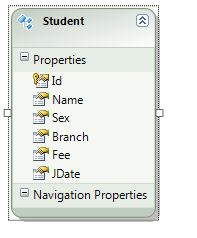
At the server Side Add new ADO.NET Entity Data Model and name it as StudentRiaModel.edmx.
add new Entity to the Model as follows.
{
Bind these ViewModel Properties and Commands to View as follows
Finally Generate DataBase From ADO.NET Entity Data Model StudentRiaModel.edmx.
Right click on design area and select Generate Database from Model. It will Generate StudentRiaModel.edmx.sql file.
Execute this .sql file by clicking Execute SQL ( It requires Enterprise Edition of SQL Server).
Execute it for the final output.
Hope this will help you to know a bit about Development using MVVM.
Here is a simple example how we develop applications using MVVM Pattern.
Open Visual Studio and take create new Silverlight Application.
In New Silverlight Application Check Enable WCF RIA Services and Click OK.
It will Create New empty Silverlight Application.
Here, The first Solution Explorer shows the empty new Silverlight project.
Next shows after implementing MVVM model in our Project.
Here, The first Solution Explorer shows the empty new Silverlight project.
Next shows after implementing MVVM model in our Project.

At the server Side Add new ADO.NET Entity Data Model and name it as StudentRiaModel.edmx.
add new Entity to the Model as follows.
Press F6 or Click on Build Solution.
Once you create Model you need to add Domain Service to it.
again click add new item in that Select Domain Service Class and name it.
StudentRiaDomainService.cs
[EnableClientAccess]
public class StudentRiaDomainService : LinqToEntitiesDomainService
{
public IQueryable GetStudents() // Returns all Student records from Student table.
{
return this.ObjectContext.Students;
}
[Insert] // Enable Insert
public void InsertStudent(Student s)
{
if (s.EntityState != EntityState.Detached)
{
this.ObjectContext.ObjectStateManager.ChangeObjectState(s, EntityState.Added);
}
else
{
this.ObjectContext.Students.AddObject(s);
}
}
[Update] // Enable Update
public void UpdateStudent(Student s)
{
}
[Delete] // Enable Delete
public void DeleteStudent(Student s)
{
}
}
Once again build Solution by Pressing F6 or Clicking on Build Solution.
It Will generate a file at client side RiaAppedmx.Web.g.cs( It will be in hidden files )
This file provides access to the Model we have created server side.
Create new ViewModel class in ViewModel Folder by taking new Class.
Once again build Solution by Pressing F6 or Clicking on Build Solution.
It Will generate a file at client side RiaAppedmx.Web.g.cs( It will be in hidden files )
This file provides access to the Model we have created server side.
Create new ViewModel class in ViewModel Folder by taking new Class.
StudentViewModel.cs
public class StudentViewModel : INotifyPropertyChanged // View Model Should Implement INotify___
{
StudentRiaDomainContext ctx = new StudentRiaDomainContext();
public event PropertyChangedEventHandler PropertyChanged;
public void RaisePropertyChanged(string propertyName)
if (propertyName != null)
PropertyChanged(this, new PropertyChangedEventArgs(propertyName));
}
public EntitySet Students { get { return ctx.Students; } }
private Student blankStudent = new Student { Id = 0, Name = "0", Fee = "0", JDate = DateTime.Now.ToString(), Sex = "0", Branch = "0" };
public Student BlankStudent
{
get { return blankStudent; }
set
{
if (blankStudent != value)
{
blankStudent = value;
RaisePropertyChanged("BlankStudent");
}
}
}
private Student selectedStudent = null;
public Student SelectedStudent
{
get { return selectedStudent; }
set
{
if (selectedStudent != value)
{
selectedStudent = value;
RaisePropertyChanged("SelectedStudent");
}
}
}
public LoadOperation lo { get { return ctx.Load(ctx.GetStudentsQuery()); } set { } }
public ICommand AddStudentCommand { get; set;}
public ICommand ClearCommand { get; set; }
public ICommand AcceptCommand { get; set; }
public ICommand RejectCommand { get; set; }
public ICommand RemoveCommand { get; set; }
public StudentViewModel()
{
LoadStudent();
AddStudentCommand = new RelayCommand(add);
AcceptCommand = new RelayCommand(Accept);
RejectCommand = new RelayCommand(() => ctx.RejectChanges());
ClearCommand = new RelayCommand(() => BlankStudent = new Student { Id = 0, Name = "0", Fee = "0", JDate = DateTime.Now.ToString(), Sex = "0", Branch = "0" });
RemoveCommand = new RelayCommand(RemoveStudent);
// BlankStudent = blankStudent;
}
private void RemoveStudent()
{
ctx.Students.Remove(SelectedStudent);
SelectedStudent = null;
}
void add()
{
RaisePropertyChanged("BlankStudent");
ctx.Students.Add(BlankStudent);
ctx.SubmitChanges();
BlankStudent = new Student { Id = 0, Name = "0", Fee = "0", JDate = DateTime.Now.ToString(), Sex = "0", Branch = "0" };
}
void Accept()
{
if (ctx.HasChanges)
{
ctx.SubmitChanges();
}
}
private void LoadStudent()
{
ctx.Load(ctx.GetStudentsQuery() , lo => { }, null);
}
}Bind these ViewModel Properties and Commands to View as follows
<StackPanel HorizontalAlignment="Left" Width="Auto"><sdk:DataGrid ItemsSource="{Binding Students}" SelectedItem="{Binding SelectedStudent, Mode=TwoWay}" Name="StudentsList" AutoGenerateColumns="False"><sdk:DataGrid.Columns><sdk:DataGridTextColumn Binding="{Binding Path=Id}" Header="Id"/><sdk:DataGridTextColumn Binding="{Binding Path=Name}" Header="Name"/><sdk:DataGridTextColumn Binding="{Binding Path=Sex}" Header="Sex"/><sdk:DataGridTextColumn Binding="{Binding Path=Branch}" Header="Branch"/><sdk:DataGridTextColumn Binding="{Binding Path=Fee}" Header="Fee"/><sdk:DataGridTextColumn Binding="{Binding Path=JDate}" Header="Joing Date"/>sdk:DataGrid.Columns>sdk:DataGrid><Grid Height="54" Width="Auto"><Grid.RowDefinitions><RowDefinition Height="31"/><RowDefinition Height="23*" />Grid.RowDefinitions><Button Content="Accept" Height="23" Width="75" Name="button1" Command="{Binding AcceptCommand}" Margin="15,6,223,2"/><Button Content="Reject" Height="23" Width="75" Name="button2" Command="{Binding RejectCommand}" Margin="117,6,121,2"/><Button Content="Remove" Height="23" Width="75" Name="Remove" Command="{Binding RemoveCommand}" Margin="215,6,23,2"/>Grid>StackPanel><StackPanel HorizontalAlignment="Right" Width="357"><Grid Name="AddStudentGrid" Height="Auto" Width="304" DataContext="{Binding Path=BlankStudent, Mode=TwoWay}"><Grid.RowDefinitions><RowDefinition Height="30"/><RowDefinition Height="30"/><RowDefinition Height="30"/><RowDefinition Height="30"/><RowDefinition Height="30"/><RowDefinition Height="30"/>Grid.RowDefinitions><Grid.ColumnDefinitions><ColumnDefinition Width="3"/><ColumnDefinition Width="97" /><ColumnDefinition Width="100*" />Grid.ColumnDefinitions><sdk:Label Grid.Row="1" Height="28" HorizontalAlignment="Left" Margin="7,10,0,0" Name="Namelabel" VerticalAlignment="Top" Width="120" Content="Name" Grid.Column="1" Grid.ColumnSpan="2" Grid.RowSpan="2" /><TextBox Grid.Row="1" Grid.Column="2" Name="Name" Margin="10,4,6,3" Text="{Binding Path=Name, Mode=TwoWay}" /><sdk:Label Grid.Row="2" Height="28" HorizontalAlignment="Left" Margin="7,10,0,0" Name="Sexlabel" VerticalAlignment="Top" Width="120" Content="Sex" Grid.Column="1" Grid.ColumnSpan="2" Grid.RowSpan="2" /><TextBox Height="23" Grid.Row="2" Grid.Column="2" Name="Sex" Text="{Binding Path=Sex, Mode=TwoWay}" Margin="10,4,6,3"/><sdk:Label Grid.Row="3" Height="28" HorizontalAlignment="Left" Margin="7,10,0,0" Name="Feelabel" VerticalAlignment="Top" Width="120" Content="Fee" Grid.Column="1" Grid.ColumnSpan="2" Grid.RowSpan="2" /><TextBox Height="23" Grid.Row="3" Grid.Column="2" Name="Branch" Text="{Binding Path=Fee, Mode=TwoWay}" Margin="10,4,6,3" /><sdk:Label Grid.Row="4" Height="28" HorizontalAlignment="Left" Margin="7,10,0,0" Name="Branchlabel" VerticalAlignment="Top" Width="120" Content="Branch" Grid.Column="1" Grid.ColumnSpan="2" Grid.RowSpan="2" /><TextBox Grid.Row="4" Grid.Column="2" Name="JDate" Text="{Binding Path=Branch, Mode=TwoWay}" Margin="10,4,6,2" /><sdk:Label Grid.Row="5" Height="28" HorizontalAlignment="Left" Margin="7,10,0,0" Name="JDatelabel" VerticalAlignment="Top" Width="120" Content="Joing Date" Grid.Column="1" Grid.ColumnSpan="2" /><TextBox Height="23" Grid.Row="5" Grid.Column="2" Name="Fee" Text="{Binding Path=JDate, Mode=TwoWay}" Margin="10,5,6,2" />Grid><Grid Height="54" Width="Auto"><Grid.RowDefinitions><RowDefinition Height="31"/> <RowDefinition Height="23*" />Grid.RowDefinitions><Button Content="Add Student" Height="23" Name="AddStudent" Width="75" Command="{Binding AddStudentCommand}" Margin="84,7,198,0"/><Button Content="Cancel" Height="23" Name="Cancel" Width="75" Command="{Binding ClearCommand}" Margin="167,6,115,2"/>Grid>StackPanel>
Finally Generate DataBase From ADO.NET Entity Data Model StudentRiaModel.edmx.
Right click on design area and select Generate Database from Model. It will Generate StudentRiaModel.edmx.sql file.
Execute this .sql file by clicking Execute SQL ( It requires Enterprise Edition of SQL Server).
Execute it for the final output.
Hope this will help you to know a bit about Development using MVVM.
No comments:
Post a Comment